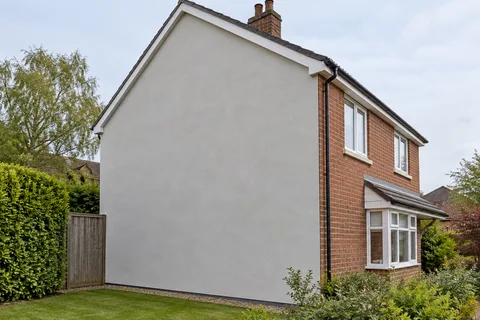
Plan the thicker wall before choosing its finish
External Wall Insulation Warrington | Details and Finishes
External wall insulation changes more than the colour of a building. The wall becomes thicker, openings become more recessed and fittings may need to move. The rendered surface is the visible finish of a complete specified system. A Warrington insulation project therefore needs design decisions at rooflines, windows, ground level and penetrations before the first board is fixed. This page explains the practical scope without assuming that every wall is suitable or promising a particular saving.

On this page
Establish the purpose and the existing construction
An assessment should identify the wall construction, condition and moisture issues, alongside the intended improvement. Solid and cavity walls are not interchangeable backgrounds, and a previously altered building may contain several constructions. The proposed system must be suitable for the actual substrate and its condition. Existing defects need an agreed treatment before they are covered. If there are questions about water entry, ventilation or structural condition, those belong in the design discussion rather than being left to the finishing team on installation day.
Deciding which elevations to insulate also requires more than measuring their visible area. Continuity at junctions, the relationship with an extension and changes around openings can affect the result. A partial scheme may need carefully designed transitions to retained uninsulated walls. The specification should explain the proposed extent and the reasons for any exclusions. For a project that only seeks a new exterior covering, compare this scope with house rendering; the two services share a final appearance but involve different decisions beneath it.
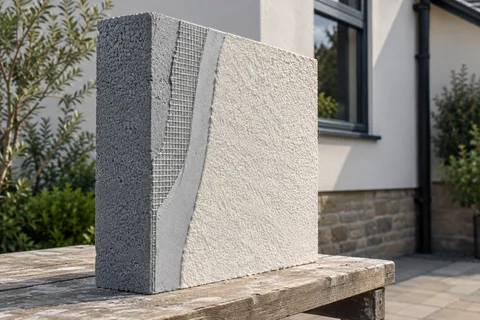
- Existing wall Prepared; fittings removed and the base track fixed above ground level.
- Insulation boards Bonded with adhesive and, in most systems, mechanically fixed to the wall.
- Basecoat with mesh Reinforcement mesh embedded across the board joints and around openings.
- Primer Where the system requires it.
- Finish render A thin-coat finish that weatherproofs the insulation.
Wall on the left, finish on the right. Not to scale: coats, thicknesses and primers follow the chosen manufacturer’s system and the condition of the wall.
Walk around the perimeter before approving the elevation
At the top, the design needs to consider eaves, verges, gutters and any roof abutments. A projection that currently sheds water clear of the wall may not do so once insulation is added. At the bottom, the relationship with ground levels, drainage, damp-proofing and the system's base detail matters. These are design interfaces, not decorative finishing touches. They should be resolved with the relevant system guidance and other trades so that the rendered face is not left dependent on improvised caps or sealant.
Around windows and doors, insulation thickness can affect sill projections, reveal widths, opening lights and nearby fittings. Some components may need replacement or extension; others need a different local detail. The aim is to retain the function of the opening while providing the specified weathering arrangement. A quote that mentions only square metres of insulation may omit substantial work here. For an occupied house, the sequence should also make clear whether windows remain usable and how temporary protection will be provided while interfaces are changed.
| Interface | Decision required before installation |
|---|---|
| Eaves and verges | How the finished wall meets the roof edge and sheds water |
| Window sills and reveals | Suitable projections, opening clearances and insulation details |
| Ground and base | The specified termination and relationship with damp-proofing and drainage |
| Vents and outlets | How their function and required clearances are preserved |
| Pipes and wall fittings | Extensions, support and suitable fixing arrangements |
Deal properly with every penetration
Air bricks, extractor outlets, flues, cables, taps and soil pipes cannot simply disappear into the new face. Their functions differ, so each needs the appropriate treatment and, where necessary, a competent specialist. Covering an opening because it interrupts a clean elevation is not an acceptable design solution. The schedule of fittings should show what is removed, extended, replaced or retained. It should also identify who carries out that work, particularly where a renderer is not the appropriate person to alter a service installation.
Fixings through an insulated system need consideration both during the project and afterwards. A light fitting, satellite dish or garden gate can place different demands on the wall. Suitable supports and weathering details should be planned for known fittings, with information retained for future alterations. Driving new fixings through the completed face without understanding the build-up can damage the system. The INCA maintenance guidance highlights the importance of caring for insulated façades as a system, rather than treating them as an ordinary solid surface that can accept any attachment.
Keep system components together
Insulation, adhesives, mechanical fixings, reinforcement, basecoat, primer and finish perform different roles. The specification should identify the intended system and its approved build-up instead of assembling products solely because their individual descriptions sound compatible. Site conditions may require checks on the background and fixing design. Those requirements need to be completed at the appropriate stage, with any findings resolved before the next layer conceals the work. The finishing colour is only one item within this larger specification.
Different finishes provide different textures and maintenance requirements. A silicone finish is one possible component where the system allows it, but the label does not describe the insulation or the fixing arrangement beneath. Samples should show the intended finish and colour, while the technical proposal describes the rest. On multiple buildings or mixed-use premises, our commercial rendering page explains how sample approval, inspection stages and information handover can be organised without relying on a final visual inspection alone.
Plan the work around the occupied building
Scaffold access, temporary removal of rainwater fittings, delivery space and protection of entrances all influence the programme. The work also needs suitable conditions for the specified materials and enough time for the required stages. Residents should know which routes remain available and when individual fittings will be affected. If the building contains several occupiers, the responsibility for communicating changes needs to be clear. A well-defined sequence is particularly useful where roofline or window work is taking place under a separate contract.
At handover, retain the system identification, colour reference, relevant installation records and maintenance information. Confirm the arrangements for future local repairs and alterations rather than treating every damaged patch as ordinary render. Check that vents, outlets and drainage routes remain functional and that the completed interfaces match the agreed details. The Warrington service overview provides related guides for the surrounding work. The value of a complete specification is that it joins those decisions together before the wall is covered.
Common questions
Can external insulation be added to just one wall?
Sometimes a partial scheme is possible, but its junctions, moisture implications and overall design need assessment. A single elevation should not be specified in isolation from the adjoining walls, openings and roof or ground details.
Does new render always include insulation?
No. Render-only work and an external wall insulation system are separate scopes. A quotation should explicitly identify insulation type, thickness and the complete system if insulation is included. A decorative finish description alone does not establish that.
See housing and planning information for Warrington and nearby places, including the source and geography behind each figure.